Tuesday, October 10, 2006
Introduction
I have found a new hobby for myself. I am going to be brewing my own beer right at home.
The equipment was rather inexpensive, especially since I had some of the more expensive stuff.
What I had to begin with:
Glass Carboy $15
This is basically a big glass water jug. You've seen them in offices... When people talk about gathering around the water cooler... Yah. One of those.
These can range in the $15-$25 range or more.

Pots
While the pots that I have should really be POT (singular) I will have to make due with what I have. Right now I have 3 pots. One-2gal, & two-1.5gal.(est. only).
I figure that since these can range in the $50-& up range, I would just split my boil in three different pots for now until I get really into this.
What I had to get:
Siphon $7
This is for two reasons, basically both being the same general idea.
1. I have to move the brew twice during fermentation. Once after (lets say) 1 week to a secondary fermentor to let it sit a little longer and to clear out some of the sediment gunk.
2. The second time is to pitch it to the bottling bucket.
3. The third time is to the bottles themselves.
Each time you want as little aeration as possible. To much Oxygen will spoil the beer.

2 Airlocks $.60 (cent a piece)These are put on top of the fermenting tanks to let the CO2 out and to KEEP the O2 out. Like I said before, Oxygen is bad. Airlocks also tell you how much CO2 is being release. That tells you is the yeast is still activly fermenting or if it has stalled and is time to switch to the secondary fermentor.
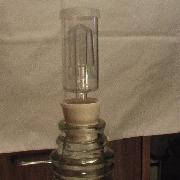
Plugs $.15 (cents a piece)
These are exactly what they sound like. The plug goes in the top of the glass carboy as a seal. Then the Airlock goes in the Plug. There is a hole just big enough to fit the airlock in.

Thermometer $3
Gee wiz. Let me think what this is for.
When you are boiling the wort (the initial brew before being mixed with the yeast), well actually after you have boiled it for about 1 1/2 hours, you have to let it cool.
Now boiling occurs around 210 F. You cannot mix the wort with the yeast until it is below 80 F. Hence the thermometer. And not just any thermometer... One that is specialized for boiling/frying/or any other sustained high temperatures.
I got one for, I think, $3 bucks at Wally-World. It works great. I tested it tonight. The temp. readings change immediately and not slowly like normal room thermometers.
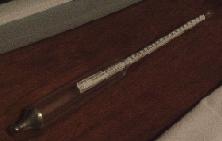
Hydrometer $5
This measures the weight of the wort. Basically meaning the ratio of malt/barley to water that your wort has. This is usually measured in Gravity. You'll usually see OG (for Original Gravity) or FG (Final Gravity). The gravity will also give you an idea of the alcohol content of your final beer.
This is an absolutely necessary tool in beer making.
Bottling Bucket $13
This bucket can be used for two different things.
1. You can use it as a secondary ferementor.
2. You use it primarily to transfer the beer to the bottles. Like I said before. You don't want to aerate the beer to much because it will spoil. The bucket has a spigot built in. By attaching the siphon to this you can fill the bottles from the bottom up with a nifty little bottle filler gadet on the hose. When you press down it fills. When you lift up, it stops. Neat huh. Well... I guess you'd have to actually see it to be facinated. I could have built one myself with available food grade buckets I have but that would just have been to much of a hassle.

The last piece of equipment, I built myself. And I am very proud of!
Wort Chiller (Immersion type) $15


You can buy them ready-made from a Homebrew supply store or on the internet, but I wanted to make mine. I saw the instructions for it on the internet and said, "Why pay $30 or $40 for a new one, when I can build one for $15-$20?" And that is what I did.
What is a Wort Chiller?
Good question. The hole thing with brewing beer is that you want it exposed to air as little as possible.
Let me ask you a question. If you boil 2 gallons of water, how long will it take to cool back down to room temperature?
Now imagine that but with perhaps 3, 4, or 5 gallons. Well I know how long it takes to cool down 1.5 gallons. It takes around 4 1/2 hours. That is alot of time that your precious wort is exposed to the air.
At this point in the brewing process the oxygen and spoilage is not the problem (that comes when it is mixed with the yeast). Actually, when you pitch it, you want to aerate it. But that is the extent of the desireable aeration. Remember that the air has lots of tiny airborn particles floating around. Any of them can plop right in to your precious brew, and ANY of them can contain bacteria that will give your beer an infection, etc.
Of course I am thinking of worse case senerios. Letting it sit all day while waiting for it to cool is a perfectly acceptable way of cooling the wort, and used by many brewers, but is not really desirable among any of them.
Alright, back to what a Wort Chiller does. By my previous rant, you might have figured it out. A Wort Chiller cools the wort to an acceptable pitching (mixing with the yeast) temperature. The wort has to be below 80 or 85 F. My immersion chiller draws the heat away from the water. Thus cooling it down faster.
I tested mine out tonight, after I finished building it, on 1.5 gallons of boiling water. It took around 15 minutes to cool the water from 210 F to 80F. I was quit impressed with myself.
Well those are the necessary supplies. That's around $55.50 in needed equipment. I already had a glass carboy so take $15 buck off that final price. I only paid for $40.50 for what I needed. And you can buy the ingrediant on line for cheap and at the home brew store for a reasonable price.
The number 1 rule in brewing is:
Always clean and Sterilize anything that will touch the brew. That is the number one cause for bad batches.
The equipment was rather inexpensive, especially since I had some of the more expensive stuff.
What I had to begin with:
Glass Carboy $15
This is basically a big glass water jug. You've seen them in offices... When people talk about gathering around the water cooler... Yah. One of those.
These can range in the $15-$25 range or more.

Pots
While the pots that I have should really be POT (singular) I will have to make due with what I have. Right now I have 3 pots. One-2gal, & two-1.5gal.(est. only).
I figure that since these can range in the $50-& up range, I would just split my boil in three different pots for now until I get really into this.
What I had to get:
Siphon $7
This is for two reasons, basically both being the same general idea.
1. I have to move the brew twice during fermentation. Once after (lets say) 1 week to a secondary fermentor to let it sit a little longer and to clear out some of the sediment gunk.
2. The second time is to pitch it to the bottling bucket.
3. The third time is to the bottles themselves.
Each time you want as little aeration as possible. To much Oxygen will spoil the beer.

2 Airlocks $.60 (cent a piece)These are put on top of the fermenting tanks to let the CO2 out and to KEEP the O2 out. Like I said before, Oxygen is bad. Airlocks also tell you how much CO2 is being release. That tells you is the yeast is still activly fermenting or if it has stalled and is time to switch to the secondary fermentor.

Plugs $.15 (cents a piece)
These are exactly what they sound like. The plug goes in the top of the glass carboy as a seal. Then the Airlock goes in the Plug. There is a hole just big enough to fit the airlock in.

Thermometer $3
Gee wiz. Let me think what this is for.
When you are boiling the wort (the initial brew before being mixed with the yeast), well actually after you have boiled it for about 1 1/2 hours, you have to let it cool.
Now boiling occurs around 210 F. You cannot mix the wort with the yeast until it is below 80 F. Hence the thermometer. And not just any thermometer... One that is specialized for boiling/frying/or any other sustained high temperatures.
I got one for, I think, $3 bucks at Wally-World. It works great. I tested it tonight. The temp. readings change immediately and not slowly like normal room thermometers.
Hydrometer $5
This measures the weight of the wort. Basically meaning the ratio of malt/barley to water that your wort has. This is usually measured in Gravity. You'll usually see OG (for Original Gravity) or FG (Final Gravity). The gravity will also give you an idea of the alcohol content of your final beer.
This is an absolutely necessary tool in beer making.

Bottling Bucket $13
This bucket can be used for two different things.
1. You can use it as a secondary ferementor.
2. You use it primarily to transfer the beer to the bottles. Like I said before. You don't want to aerate the beer to much because it will spoil. The bucket has a spigot built in. By attaching the siphon to this you can fill the bottles from the bottom up with a nifty little bottle filler gadet on the hose. When you press down it fills. When you lift up, it stops. Neat huh. Well... I guess you'd have to actually see it to be facinated. I could have built one myself with available food grade buckets I have but that would just have been to much of a hassle.

The last piece of equipment, I built myself. And I am very proud of!
Wort Chiller (Immersion type) $15


You can buy them ready-made from a Homebrew supply store or on the internet, but I wanted to make mine. I saw the instructions for it on the internet and said, "Why pay $30 or $40 for a new one, when I can build one for $15-$20?" And that is what I did.
What is a Wort Chiller?
Good question. The hole thing with brewing beer is that you want it exposed to air as little as possible.
Let me ask you a question. If you boil 2 gallons of water, how long will it take to cool back down to room temperature?
Now imagine that but with perhaps 3, 4, or 5 gallons. Well I know how long it takes to cool down 1.5 gallons. It takes around 4 1/2 hours. That is alot of time that your precious wort is exposed to the air.
At this point in the brewing process the oxygen and spoilage is not the problem (that comes when it is mixed with the yeast). Actually, when you pitch it, you want to aerate it. But that is the extent of the desireable aeration. Remember that the air has lots of tiny airborn particles floating around. Any of them can plop right in to your precious brew, and ANY of them can contain bacteria that will give your beer an infection, etc.
Of course I am thinking of worse case senerios. Letting it sit all day while waiting for it to cool is a perfectly acceptable way of cooling the wort, and used by many brewers, but is not really desirable among any of them.
Alright, back to what a Wort Chiller does. By my previous rant, you might have figured it out. A Wort Chiller cools the wort to an acceptable pitching (mixing with the yeast) temperature. The wort has to be below 80 or 85 F. My immersion chiller draws the heat away from the water. Thus cooling it down faster.
I tested mine out tonight, after I finished building it, on 1.5 gallons of boiling water. It took around 15 minutes to cool the water from 210 F to 80F. I was quit impressed with myself.
Well those are the necessary supplies. That's around $55.50 in needed equipment. I already had a glass carboy so take $15 buck off that final price. I only paid for $40.50 for what I needed. And you can buy the ingrediant on line for cheap and at the home brew store for a reasonable price.
The number 1 rule in brewing is:
Always clean and Sterilize anything that will touch the brew. That is the number one cause for bad batches.
Comments:
<< Home
I had a feeling one could make a wort chiller cheaper than buying one. Where did you find the directions?
Post a Comment

<< Home
![]()