Thursday, October 26, 2006
Day 15 (10-26-06) (70F)
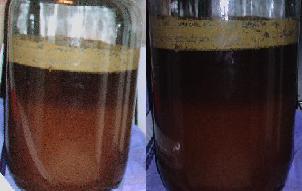
If you read the previous post, I talked about there being floating particles consistantly spread about 1/2 inch beneath the surface.
Over the past week, they have steadily decended futher and further down.
It is very difficult to get a ood picture of them since they are so difficult to see... so I apologize for not having any picture to show as reference.
When I checked today, they are sitting about 2 inches from the bottom.
My theory about these particles is: They are heavier than the clearing wort at the top but lighter than the unclear wort further down in the container. So like oil and water, these particles are sitting on the mass that is more dense than itself. These particles are floating on this Heavy Wort.
I find this phenomenon helpful in that it shows that the crud is settling out and the wort is clearing. It shows me exactly where the progress is. I have watch it fall all week.
Friday, October 20, 2006
Day 9 (10-20-06)(73)
Well, it's been sitting n the secondary fermenter for nearly 2 days now. There is not much activity. I have noticed 2 things:
- The airlock is floating (probably from the released CO2 pushing out the O2 in the head space.)
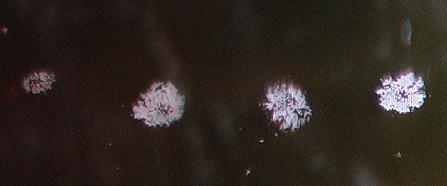
- there are some floaters in carboy. By that I mean, it looks as if some of the sediment has floated to the top... well almost the top. It seems to be consistantly spread around about 1/2 in beneath the surface. There are just particle of what looks like, some of the sediment. They are to hidden to get a good picture though.
- There are a couple spots on the surface of bubbles forming. Very small spots all around the surface. Maybe 2-3mm in size.
 If you look in the picture above you will see the bubbles rising from under the spots.
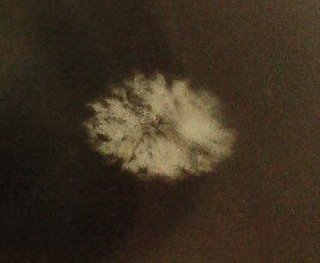 While this picture is a tad fuzzy, while I was taking it, I zoomed in really tight and saw the spot accumulating more bubbles. And once again I am assured that these are not mold spots.

Wednesday, October 18, 2006
Day 7 (10-18-06)(70F)
- 11:30am
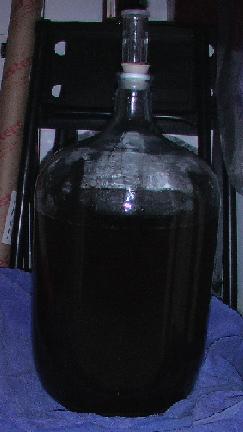
- I gently moved the carboy from the closet to the kitchen counter. I did not disturbe or churn the wort at all.
- I had the Secondary (5 gal) carboy ready on the floor.
- The siphon hose was full of water so that it was primed for the wort move. I placed the siphon in the Primary and the other end in a pan to catch the water run-out until the tube was full of wort.
- Once the tube was full of wort, I closed it with the supplied valve clamp and put the end in the secondary carboy. The tube was resting flat on the bottom. That way it would not aerate th wort comming out by spashing around.
- I opened the hose and the wort began to flow.
- The siphon stopped while there was still about 1.5 inches left at the bottom. This was the fluid just above the yeast cake at the bottom. The siphon did not get that because air got in the hose. I tried to get the siphon going once but it wouldn't work. The wort got mixed a little when I was trying to get it going again, so I just considered it a loss. After all, the reason for moving to a secondary is to get the wort away from the gunk at the bottom.
- I calculated that it was around 1/2 gallon if not a little more.
- There was 4 inches of head room in the secondary fermenter. I was a little worried about this but the advice I got from www.realbeer.com was that the CO2 that is released during the move would push the oxygen out of the space and it would be okay.

- Next time I will put a wedge or something to keep the carboy tilted. That way I will be able to get more.
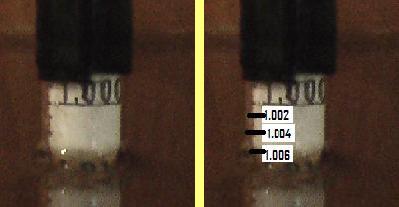
- I took a hydrometer reading. Gravity = 1.006 (but I had to adjust for temp. to 1.007 @ 70F because the hydrometer is calabrated for 60F). My OG = 1.033.

- According to some charts I have, that puts my current alcohol content at around 3.5%.
- (Difference between 2 reading) X (131)=Alcohol by volume percent
- (1.033 - 1.007) X 131 = 3.406% ABV
- That is not too bad. I am hoping to get a tiny bit more out of it after the next 2 week conditioning phase.
- (Difference between 2 reading) X (131)=Alcohol by volume percent
- Snuck a small sample to see how the taste was. Yup. Just as I suspected. It tasted like beer, Ale style actually (since, afterall it is an Ale). I was rather impressed with myself.
- I filled the airlock with a sterile (chlorox/water) solution. Since I didn't pre-boil any water like I did with the Primary, I read that that was best.
- I put on the plug and airlock and stuck it back in the closet (in the dark). And there is shall stay for the next 2 weeks.
- Then it will go in bottles and I will wait another 3 weeks.
Moving to Secondary Fermenter - I gently moved the carboy from the closet to the kitchen counter. I did not disturbe or churn the wort at all.
- 11:59pm:
- The airlock (the floating piece) is floating. That's a good sign. It means the air has been pushed out of the space and replaced with CO2.
- There are particles floating just beneath the surface. The wort looks to be clearing about an inch beneath the surface. The particles are floating on this second layer where it is still not clear.
- The airlock (the floating piece) is floating. That's a good sign. It means the air has been pushed out of the space and replaced with CO2.
Note:
Unfortunately there is a large amount of headroom in the secondary. I'd say it is missing about 1 gallon in the secondary.
I figure this comes from two reasons.
- Not being able to siphon off the 1.5 inches (around 1/2 gallong)from the primary.
- And perhaps not having enough liquid initially in the original brew (mostly due to evaporation).
Tuesday, October 17, 2006
Day 6 (10-17-06)(70F)
- Opening Observation - Liquid dark. Alot less muddy. Took some good pictures of the floating spots.
- 4:21pm - No bubbles in airlock | spots are definitely some risidual fermentation on the top. It looks as if the yeasts are still lightly fermenting. These are small patches of bubbles like mini-krausen all over the surface.
- 10:45pm - Stil patches floating. | There is a layer of yeast nearly 1/2 inch thick on bottom of carboy. I noticed it around day 3. Then there is a dark layer under the yeast layer.


Note:
I am going to transfer to a secondary tomorrow (Wednesday). That will have given the primary nearly a full week.
I have cleaned and sanitized all of my necessary equipment.
- 5 Gallon glass carboy
- Hydrometer
- Plug
- Airlock
- Siphon hose
Monday, October 16, 2006
Day 5 (10-16-06) (75F)
- Opening Observation - Clearing at 6.5 inches
- 2:00pm - No bubbling in airlock | Krausen flat. Some small residue floating on the liquid. Look as if there are small spots of activity sitting on top (.25X.25 inch in size). Almost looks like a mold but not. when I look closely, they are bubbles | Clearing at 6.5 inches
- 11:00pm - No bubbles in airlock | Clearing seems to be gone again, except for .25inch strip under krausen layer | Krausen still covered with spots.
Sunday, October 15, 2006
Day 4 (10-15-06) (73F)
- Opening Observation - Clear section under krausen gone. All liquid is muddy brown again.
- 1:30pm - No bubbling in airlock | Krausen thin layer 8th inch
| Clearing gone. All muddy again - 7:00pm - No bubbling in airlock | Krausen unchanged|
Clearing retuned to 1/4 inch - 8:00pm - No bubbling in airlock | Krausen unchanged |
Clearing at 1 inch - 11:15pm - No Bubbling in airlock | Krausen unchanged |
Clearing at 2 inches

Saturday, October 14, 2006
Day 3 (10-14-06) (73F)
- Opening Observation - Liquid muddy except there is a ½ in layer under Krausen that is beginning to clear to dark amber colored liquid
- 10:15am – No bubbling in airlock | Krausen unchanged
- 6:30pm – No bubbling in airlock | Krausen unchanged
| Clearing 2 ½ inches - 10:00pm - No bubbling in airlock | Krausen unchanged| clearing 7 inches
Friday, October 13, 2006
Day 2 (10-13-06)(75F)
- Opening Observation - Liquid still muddy looking.
- 7:00am – 1 Bubble every 1 second | Still thick krausen / it’s actively moving
- 3:30pm – 1 bubble every 21 sec. (SLOWING) | Krausen flattened to 1/4 inch
- 5:45pm – 1 bubble every 40 sec. (SLOWING) | Krausen unchanged
- 10:00pm – No bubbling in airlock | Krausen unchanged

Thursday, October 12, 2006
Day 1 5:30pm (10-12-06) (73F)
- Opening Observation - Immediately upon putting in the closet the fluid looked like muddy water.
- 6:00pm – No activity
- 7:00pm – No activity
- 8:00pm – Air lock beginning to float | Thin Krausen film forming
- 9:00pm – 1 bubble sitting in airlock | More pronounce krausen forming
- 10:00pm – 2 bubbles sitting in airlock | Thick krausen visible (1.5 inches)
- 11:00pm – 1 bubble every 2 seconds | Still thick Krausen

My First Home Brew Attempt
Kit Stats
OG = 1.042-1.044
FG = 1.010-1.012
HBU= 13
Recipe Volume = 5 gallons
Yeast = 1 packet Muntons Dry Yeast (6grams)
Malt Amounts
LME = 3.3 lbs Munton’s (From England) Hopped Amber
Solids – 80-82%
Color – (EBC) 16-20
Bitterness – (EBUs) 45-55
DME = 2 lbs Munton’s Light
Color – 8 (EBC) / Lovibond 3.5
Hops
Amount Add Time Type %Alpha Acids
---------------------------------------------------------
.5 oz 45 min Cascade 5.3%
.5 oz 50 min Cascade 5.3%
Calculated OG (Original Gravity) = 1.030
(Adjusted based on Hydrometer chart for 84F 1.033)
Calculated IBUs = (ex. 40)
Brew Day Procedure
- 1inch had evaporated from each pot
- At 40 min, combined pot 3 with pot 2
- At 40 min, combined pot 3 with pot 2
- Added 1st hops at 45 min
- Added 2nd hops at 50 min
- Boiled 60 min total
- Took off heat
- Sterilized immersion chiller in boiled water during brew process.
- Cooled wort with immers. Chiller
- Took 20min (200F – 85F)
- Took 20min (200F – 85F)
- Boiled .5 gal water extra to compensate for evaporated water during brew boil & hot break refuse
- Cooled and added to Primary Fermentor
- Cooled and added to Primary Fermentor
- Poured prepared yeast in Primary Fermentor
- Poured cooled wart in Primary Fermentor via funnel
- Some of the hot break and hops were poured into the carboy
- The remainder was discarded
- The remainder was discarded
- Some of the hot break and hops were poured into the carboy
- Churned the carboy by shaking and swishing
- Took OG with sterilized hydrometer
- OG = 1.030
- Adj OG (according to scale in Hydrometer for 84F) = 1.033
- OG was lower than est 1.040 in kit directions
- Adj OG (according to scale in Hydrometer for 84F) = 1.033
- OG = 1.030
- Probably overcompensated the amount of evaporate
- Put the carboy in a dark closet at 76F (5:30pm Thurs 10-12-06)
- Boiled water for 10 min for airlock
- Filled airlock with cooled water
- Attached sterilized airlock to carboy
- Filled airlock with cooled water
--------------------------------------------------------
- Mixed 6oz dry yeast (1 packet) with 1cup cooled (75F) pre-boiled water & stirred
- Covered w/ ziplock bag (no cellophane handy) & sat in warm, away from sunlight spot
- Boiled ¼ cup water/1 tsp LME together in microwave and cooled to room temp & added to yeast mix
- Covered w/ ziplock again & sat in warm/no sun environment
- Not a lot of activity after30 min so I added 1 tsp of cooled boiled brew & sit for hour
- Thought yeast was dead but I noticed small bubbles rising from bottom (as in glass of beer)
Tuesday, October 10, 2006
Introduction
I have found a new hobby for myself. I am going to be brewing my own beer right at home.
The equipment was rather inexpensive, especially since I had some of the more expensive stuff.
What I had to begin with:
Glass Carboy $15
This is basically a big glass water jug. You've seen them in offices... When people talk about gathering around the water cooler... Yah. One of those.
These can range in the $15-$25 range or more.

Pots
While the pots that I have should really be POT (singular) I will have to make due with what I have. Right now I have 3 pots. One-2gal, & two-1.5gal.(est. only).
I figure that since these can range in the $50-& up range, I would just split my boil in three different pots for now until I get really into this.
What I had to get:
Siphon $7
This is for two reasons, basically both being the same general idea.
1. I have to move the brew twice during fermentation. Once after (lets say) 1 week to a secondary fermentor to let it sit a little longer and to clear out some of the sediment gunk.
2. The second time is to pitch it to the bottling bucket.
3. The third time is to the bottles themselves.
Each time you want as little aeration as possible. To much Oxygen will spoil the beer.

2 Airlocks $.60 (cent a piece)These are put on top of the fermenting tanks to let the CO2 out and to KEEP the O2 out. Like I said before, Oxygen is bad. Airlocks also tell you how much CO2 is being release. That tells you is the yeast is still activly fermenting or if it has stalled and is time to switch to the secondary fermentor.
Plugs $.15 (cents a piece)
These are exactly what they sound like. The plug goes in the top of the glass carboy as a seal. Then the Airlock goes in the Plug. There is a hole just big enough to fit the airlock in.

Thermometer $3
Gee wiz. Let me think what this is for.
When you are boiling the wort (the initial brew before being mixed with the yeast), well actually after you have boiled it for about 1 1/2 hours, you have to let it cool.
Now boiling occurs around 210 F. You cannot mix the wort with the yeast until it is below 80 F. Hence the thermometer. And not just any thermometer... One that is specialized for boiling/frying/or any other sustained high temperatures.
I got one for, I think, $3 bucks at Wally-World. It works great. I tested it tonight. The temp. readings change immediately and not slowly like normal room thermometers.
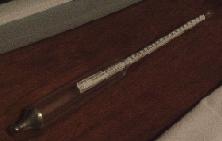
Hydrometer $5
This measures the weight of the wort. Basically meaning the ratio of malt/barley to water that your wort has. This is usually measured in Gravity. You'll usually see OG (for Original Gravity) or FG (Final Gravity). The gravity will also give you an idea of the alcohol content of your final beer.
This is an absolutely necessary tool in beer making.
Bottling Bucket $13
This bucket can be used for two different things.
1. You can use it as a secondary ferementor.
2. You use it primarily to transfer the beer to the bottles. Like I said before. You don't want to aerate the beer to much because it will spoil. The bucket has a spigot built in. By attaching the siphon to this you can fill the bottles from the bottom up with a nifty little bottle filler gadet on the hose. When you press down it fills. When you lift up, it stops. Neat huh. Well... I guess you'd have to actually see it to be facinated. I could have built one myself with available food grade buckets I have but that would just have been to much of a hassle.

The last piece of equipment, I built myself. And I am very proud of!
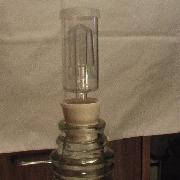
Wort Chiller (Immersion type) $15


You can buy them ready-made from a Homebrew supply store or on the internet, but I wanted to make mine. I saw the instructions for it on the internet and said, "Why pay $30 or $40 for a new one, when I can build one for $15-$20?" And that is what I did.
What is a Wort Chiller?
Good question. The hole thing with brewing beer is that you want it exposed to air as little as possible.
Let me ask you a question. If you boil 2 gallons of water, how long will it take to cool back down to room temperature?
Now imagine that but with perhaps 3, 4, or 5 gallons. Well I know how long it takes to cool down 1.5 gallons. It takes around 4 1/2 hours. That is alot of time that your precious wort is exposed to the air.
At this point in the brewing process the oxygen and spoilage is not the problem (that comes when it is mixed with the yeast). Actually, when you pitch it, you want to aerate it. But that is the extent of the desireable aeration. Remember that the air has lots of tiny airborn particles floating around. Any of them can plop right in to your precious brew, and ANY of them can contain bacteria that will give your beer an infection, etc.
Of course I am thinking of worse case senerios. Letting it sit all day while waiting for it to cool is a perfectly acceptable way of cooling the wort, and used by many brewers, but is not really desirable among any of them.
Alright, back to what a Wort Chiller does. By my previous rant, you might have figured it out. A Wort Chiller cools the wort to an acceptable pitching (mixing with the yeast) temperature. The wort has to be below 80 or 85 F. My immersion chiller draws the heat away from the water. Thus cooling it down faster.
I tested mine out tonight, after I finished building it, on 1.5 gallons of boiling water. It took around 15 minutes to cool the water from 210 F to 80F. I was quit impressed with myself.
Well those are the necessary supplies. That's around $55.50 in needed equipment. I already had a glass carboy so take $15 buck off that final price. I only paid for $40.50 for what I needed. And you can buy the ingrediant on line for cheap and at the home brew store for a reasonable price.
The number 1 rule in brewing is:
Always clean and Sterilize anything that will touch the brew. That is the number one cause for bad batches.
The equipment was rather inexpensive, especially since I had some of the more expensive stuff.
What I had to begin with:
Glass Carboy $15
This is basically a big glass water jug. You've seen them in offices... When people talk about gathering around the water cooler... Yah. One of those.
These can range in the $15-$25 range or more.

Pots
While the pots that I have should really be POT (singular) I will have to make due with what I have. Right now I have 3 pots. One-2gal, & two-1.5gal.(est. only).
I figure that since these can range in the $50-& up range, I would just split my boil in three different pots for now until I get really into this.
What I had to get:
Siphon $7
This is for two reasons, basically both being the same general idea.
1. I have to move the brew twice during fermentation. Once after (lets say) 1 week to a secondary fermentor to let it sit a little longer and to clear out some of the sediment gunk.
2. The second time is to pitch it to the bottling bucket.
3. The third time is to the bottles themselves.
Each time you want as little aeration as possible. To much Oxygen will spoil the beer.

2 Airlocks $.60 (cent a piece)These are put on top of the fermenting tanks to let the CO2 out and to KEEP the O2 out. Like I said before, Oxygen is bad. Airlocks also tell you how much CO2 is being release. That tells you is the yeast is still activly fermenting or if it has stalled and is time to switch to the secondary fermentor.

Plugs $.15 (cents a piece)
These are exactly what they sound like. The plug goes in the top of the glass carboy as a seal. Then the Airlock goes in the Plug. There is a hole just big enough to fit the airlock in.

Thermometer $3
Gee wiz. Let me think what this is for.
When you are boiling the wort (the initial brew before being mixed with the yeast), well actually after you have boiled it for about 1 1/2 hours, you have to let it cool.
Now boiling occurs around 210 F. You cannot mix the wort with the yeast until it is below 80 F. Hence the thermometer. And not just any thermometer... One that is specialized for boiling/frying/or any other sustained high temperatures.
I got one for, I think, $3 bucks at Wally-World. It works great. I tested it tonight. The temp. readings change immediately and not slowly like normal room thermometers.
Hydrometer $5
This measures the weight of the wort. Basically meaning the ratio of malt/barley to water that your wort has. This is usually measured in Gravity. You'll usually see OG (for Original Gravity) or FG (Final Gravity). The gravity will also give you an idea of the alcohol content of your final beer.
This is an absolutely necessary tool in beer making.

Bottling Bucket $13
This bucket can be used for two different things.
1. You can use it as a secondary ferementor.
2. You use it primarily to transfer the beer to the bottles. Like I said before. You don't want to aerate the beer to much because it will spoil. The bucket has a spigot built in. By attaching the siphon to this you can fill the bottles from the bottom up with a nifty little bottle filler gadet on the hose. When you press down it fills. When you lift up, it stops. Neat huh. Well... I guess you'd have to actually see it to be facinated. I could have built one myself with available food grade buckets I have but that would just have been to much of a hassle.

The last piece of equipment, I built myself. And I am very proud of!
Wort Chiller (Immersion type) $15


You can buy them ready-made from a Homebrew supply store or on the internet, but I wanted to make mine. I saw the instructions for it on the internet and said, "Why pay $30 or $40 for a new one, when I can build one for $15-$20?" And that is what I did.
What is a Wort Chiller?
Good question. The hole thing with brewing beer is that you want it exposed to air as little as possible.
Let me ask you a question. If you boil 2 gallons of water, how long will it take to cool back down to room temperature?
Now imagine that but with perhaps 3, 4, or 5 gallons. Well I know how long it takes to cool down 1.5 gallons. It takes around 4 1/2 hours. That is alot of time that your precious wort is exposed to the air.
At this point in the brewing process the oxygen and spoilage is not the problem (that comes when it is mixed with the yeast). Actually, when you pitch it, you want to aerate it. But that is the extent of the desireable aeration. Remember that the air has lots of tiny airborn particles floating around. Any of them can plop right in to your precious brew, and ANY of them can contain bacteria that will give your beer an infection, etc.
Of course I am thinking of worse case senerios. Letting it sit all day while waiting for it to cool is a perfectly acceptable way of cooling the wort, and used by many brewers, but is not really desirable among any of them.
Alright, back to what a Wort Chiller does. By my previous rant, you might have figured it out. A Wort Chiller cools the wort to an acceptable pitching (mixing with the yeast) temperature. The wort has to be below 80 or 85 F. My immersion chiller draws the heat away from the water. Thus cooling it down faster.
I tested mine out tonight, after I finished building it, on 1.5 gallons of boiling water. It took around 15 minutes to cool the water from 210 F to 80F. I was quit impressed with myself.
Well those are the necessary supplies. That's around $55.50 in needed equipment. I already had a glass carboy so take $15 buck off that final price. I only paid for $40.50 for what I needed. And you can buy the ingrediant on line for cheap and at the home brew store for a reasonable price.
The number 1 rule in brewing is:
Always clean and Sterilize anything that will touch the brew. That is the number one cause for bad batches.
![]()